Welcome to Truebooker - Online Booking Appointment Plugin.
- Item Name : Truebooker - Online Booking Appointment Plugin
- Item Version : v 1.0
- Author : Themetechmount
- Support Ticket: Truebooker Support Here
Free version & Pro version
The Truebooker is a free WordPress plugin available for download on wordpress.org. The free version of the plugin includes all the major features and options. Find more information on the plugin page.
The Pro version extend the possibilities of the plugin, Allows setting up additional payment options such as Stripe and PayPal.
Thank you for purchasing this theme. If you have any questions that are beyond the scope of this help file, feel free to contact us via our Support ticket system. We will do our best to answer you in shortest of time (24-48 hours usually).
Note:[booking_form] – This shortcode will display the basic booking form for free plugin.
[booking_form style="default"] – This shortcode will display the basic booking form default style for premium plugin and [booking_form style="style1"] [booking_form style="style2"] – This shortcode will display the basic booking form style1 and style2 for premium plugin
System Requirements
Here are the system requirements you need in order to use Truebooker and avoid any technical issues. If you are not sure whether your server supports this, contact your host.
- WordPress 5.7 or higher.
- PHP 7.2 or greater. WordPress officially suggests to use PHP 7.4.
Note: If your site is hosted on a server with an older PHP, you may experience issues. We recommend you contact your hosting provider to upgrade to the latest version of PHP.
- MySQL 5.6 or greater OR MariaDB version 10.0 or greater (MySQL is preferred).
- WP Memory limit of 128 MB or greater (256 MB or higher is preferred).
Attention Please make sure you have latest version of WordPress installed. Also please see WordPress offical page for minimum requirements.
Javascript must be enabled on browsers viewing this plugin. Though non-javascript browsers are supported, this is necessary for full-feature experience.
WordPress Information
To install this plugin you must have a working version of WordPress already installed. If you need help installing WordPress, follow the instructions in WordPress Codex or you can watch the. Below are ll the useful links for WordPress information.
- WordPress Codex – general info about WordPress and how to install on your server
- First Steps With WordPress – general information that covers a wide variety of topics
- FAQ New To WordPress – the most popular FAQ’s regarding WordPress
Plugin Installation
Installation of the Free Version or Pro Version
To install the Truebooker plugin you need to download the file from wordpress.org.
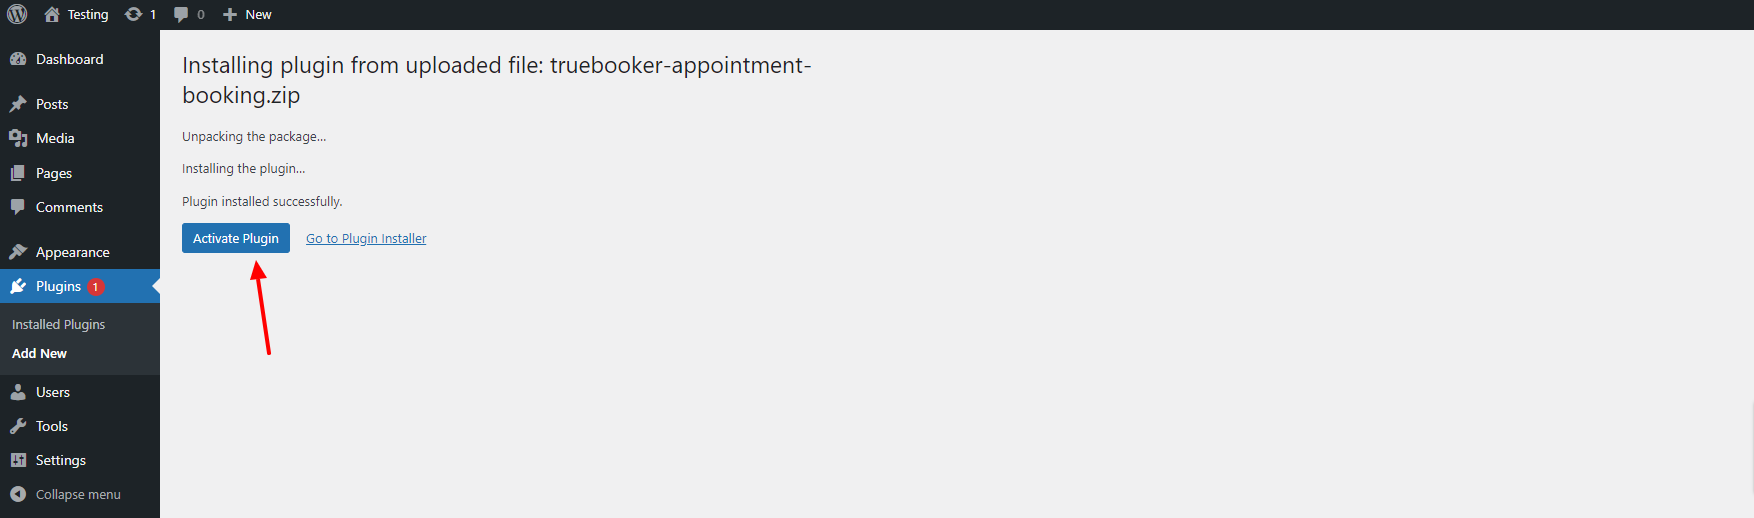
Download the plugin archive file here https://wordpress.org/plugins/truebooker/ and follow to Plugins > Add New from your dashboard.
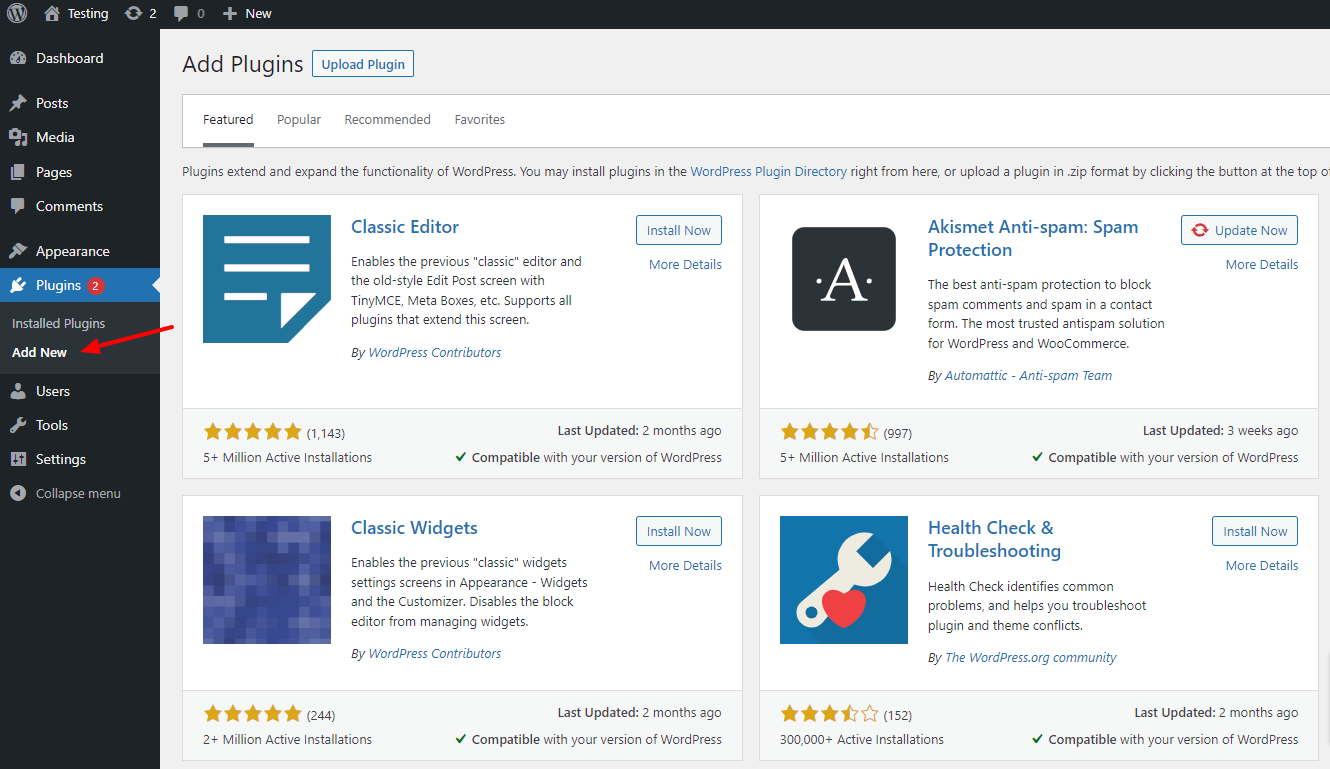
Click on the Upload Plugin button and select the Truebooker file. Click Install Now and wait for the installation to finish.

After the installation, you need to activate the plugin and you can start working.
Insert Form Into The Page
The Truebooker can be displayed on the page in several ways.
You can use shortcodes to display the booking form on pages or posts.
Adding Shortcode
If you want to add a booking form with all categories, services, and subservices on the website page, just use [booking_form] shortcode.
Shortcode for free plugin : [booking_form] - This shortcode will display the basic booking form for free plugin.
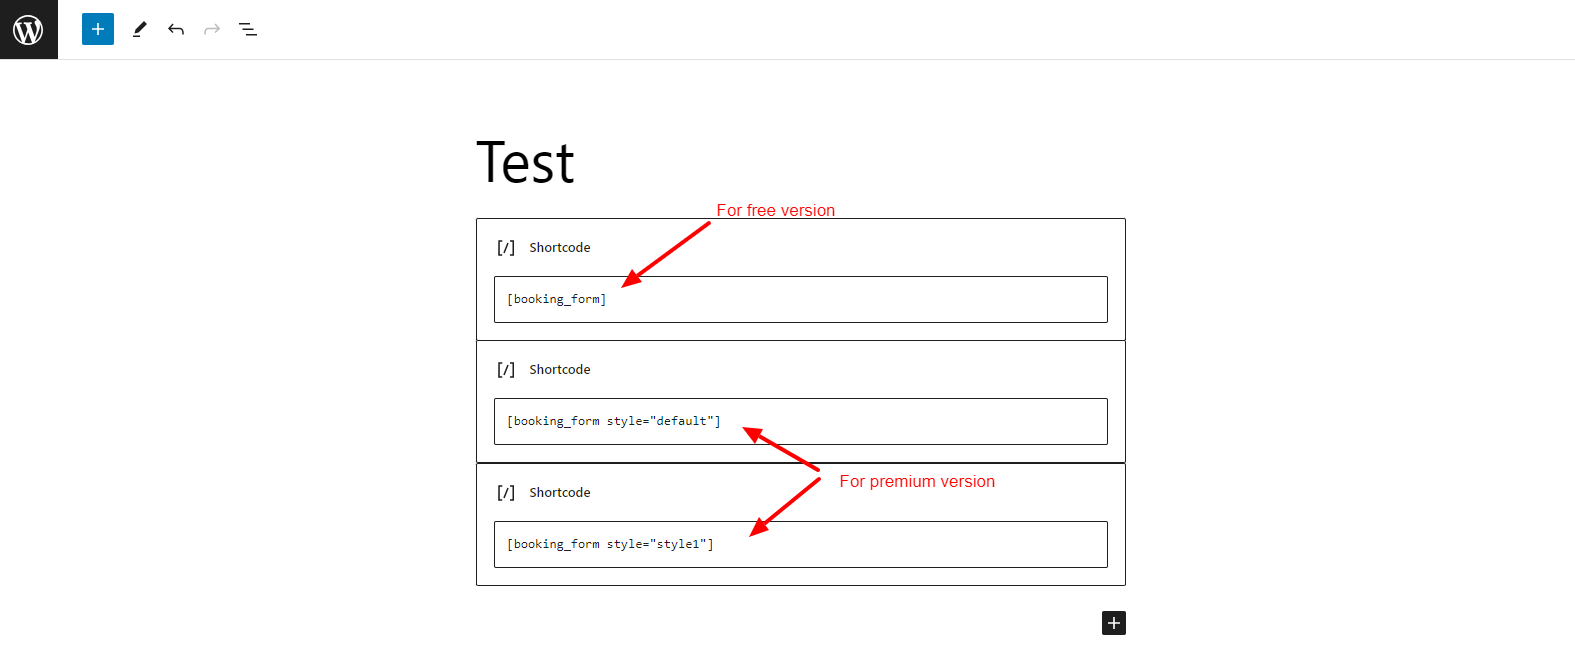
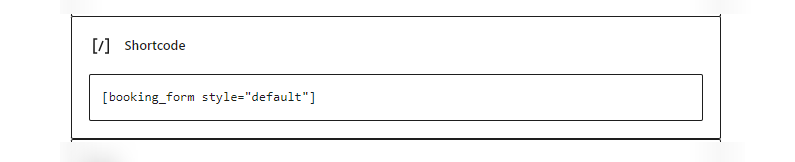
Shortcode for premium plugin : [booking_form style="default"] - This shortcode will display the basic booking form default style for premium plugin and [booking_form style="style1"]– This shortcode will display the basic booking form style1 (Tab style) for premium plugin.
Afterward, go to the Pages > Add New to create a new page.

You can use shortcodes to display the booking form on pages or posts. You can easily add shortcode for form in Classic Editor of WordPress, Elementor Website Builder, WPBakery Page Builder and Gutenberg page builder of WordPress.

Click on the Publish button on the right top corner to display the calendar on the newly created page.
Outcome:
Adding Shortcode For premium version
For premium version shortcode for default style:
Outcome:
For premium version shortcode for tab style:

Outcome:

Plugin Setting
General Setting
Download the plugin archive file and follow to Plugins > Add New from your dashboard. Click on the Upload Plugin button and select the Truebooker file. Click Install Now and wait for the installation to finish. After the installation, you need to activate the plugin and you can start working.
Step : 1 Now first you need to set details so go to Truebooker > Setting. On the settings screen, you can find different tabs for different options. Add payment details in Payment Setting and add email details in Email Settings (Sender Email is for appointment email send from this email to customers.) and also you can change inbuilt messages in Messages setting and then click on save button at top right of form.
Step : 2 Go to Truebooker > Categories and add new categories like Fitness, Medical, Spa etc.
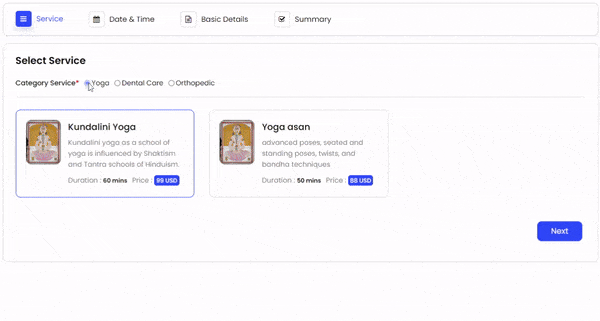
Step : 3 Go to Truebooker > Services and add new service like Workout, Yoga, Zumba etc for Fitness. Surgery, Dental Care, Orthopedic etc for Medical and body treatments, Aromatherapy Massage, Facial Spa etc for Spa.
Step : 4 Go to Truebooker > SubServices and add new sub services like Push-up, Running, Strength training for Workout (Hatha yoga, Kundalini yoga etc for Yoga and Fitness Zumba, Zumba Gold etc for Zumba). Laparoscopy, Endoscopy, Cataract surgery etc for surgery (Dental Crowns, Cosmetic Fillings etc for Dental Care and Bone deformities, Fractures etc for Orthopedic) and Body Scrubs, Dry brushing, Moisturizing body treatments etc for body treatments (Swedish Massage, Aromatherapy Massage etc for Massage and LED Facial, Anti-Aging Facial etc for Facial Spa.)
Step : 5 Now you can add appointment go to Truebooker Customers > Fill the form and add appointment.
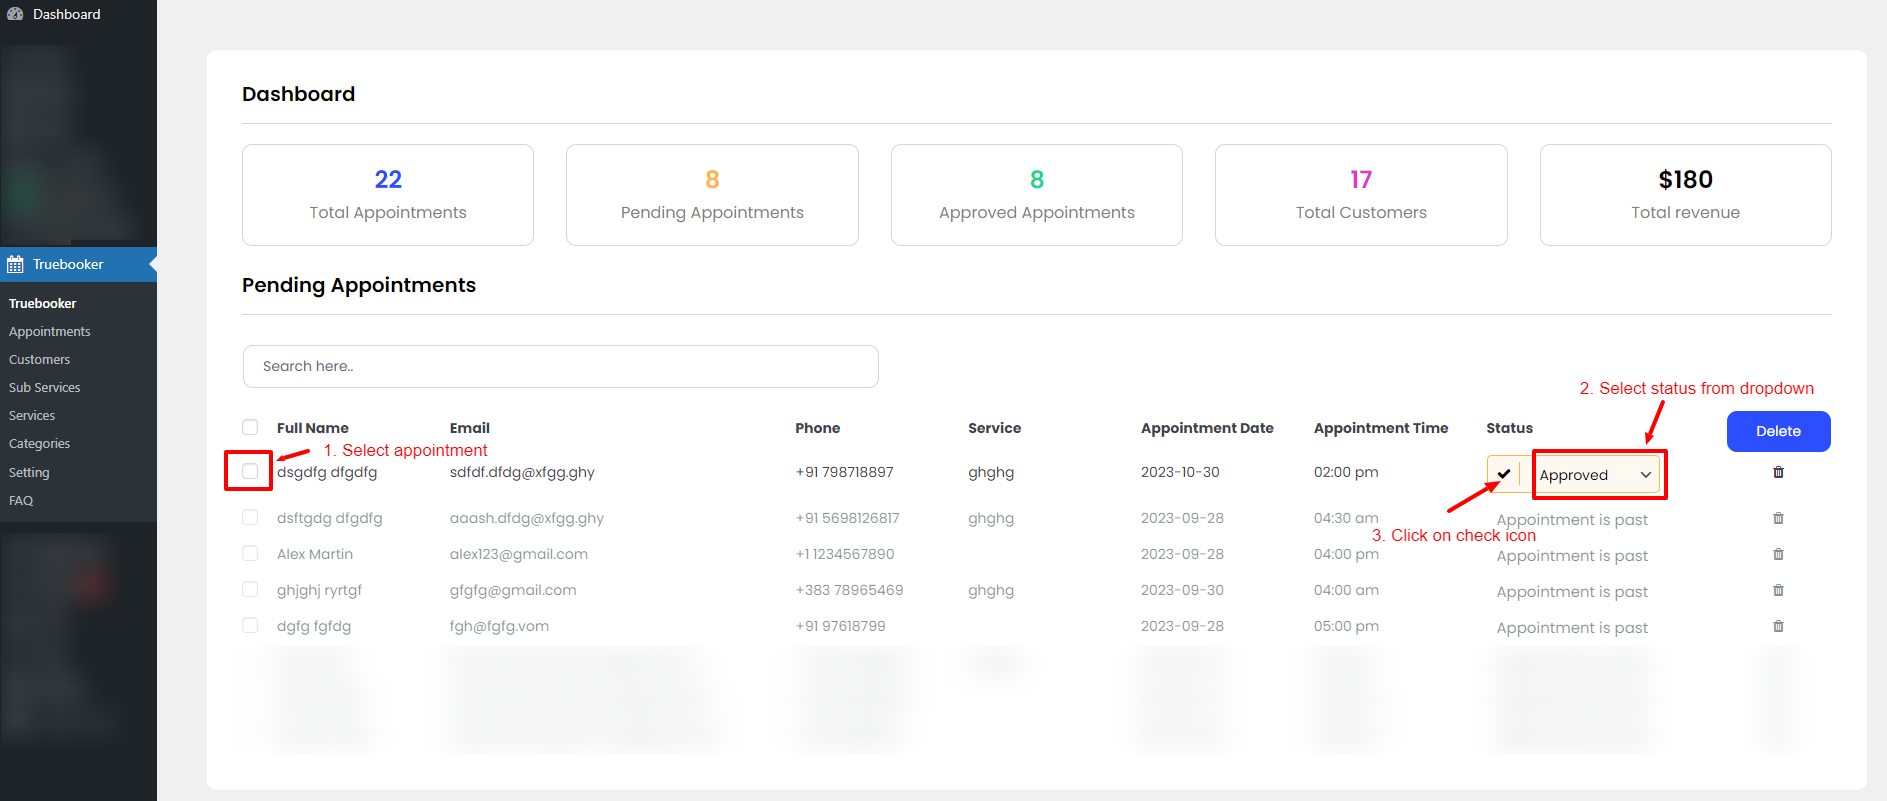
On the dashboard you can see Total appointments, Pending appointments, Approved appointments, Total customers and Total revenue. You can easily change appointment status from the dashboard and Truebooker > Appointments page just select appointment and click on select box and then click on check icon and it will be done.
Here you can add Currency for price. You can add like USD, INR, EUR etc

Payment Settings
The Payment section allows you to set up possible payment gateways.
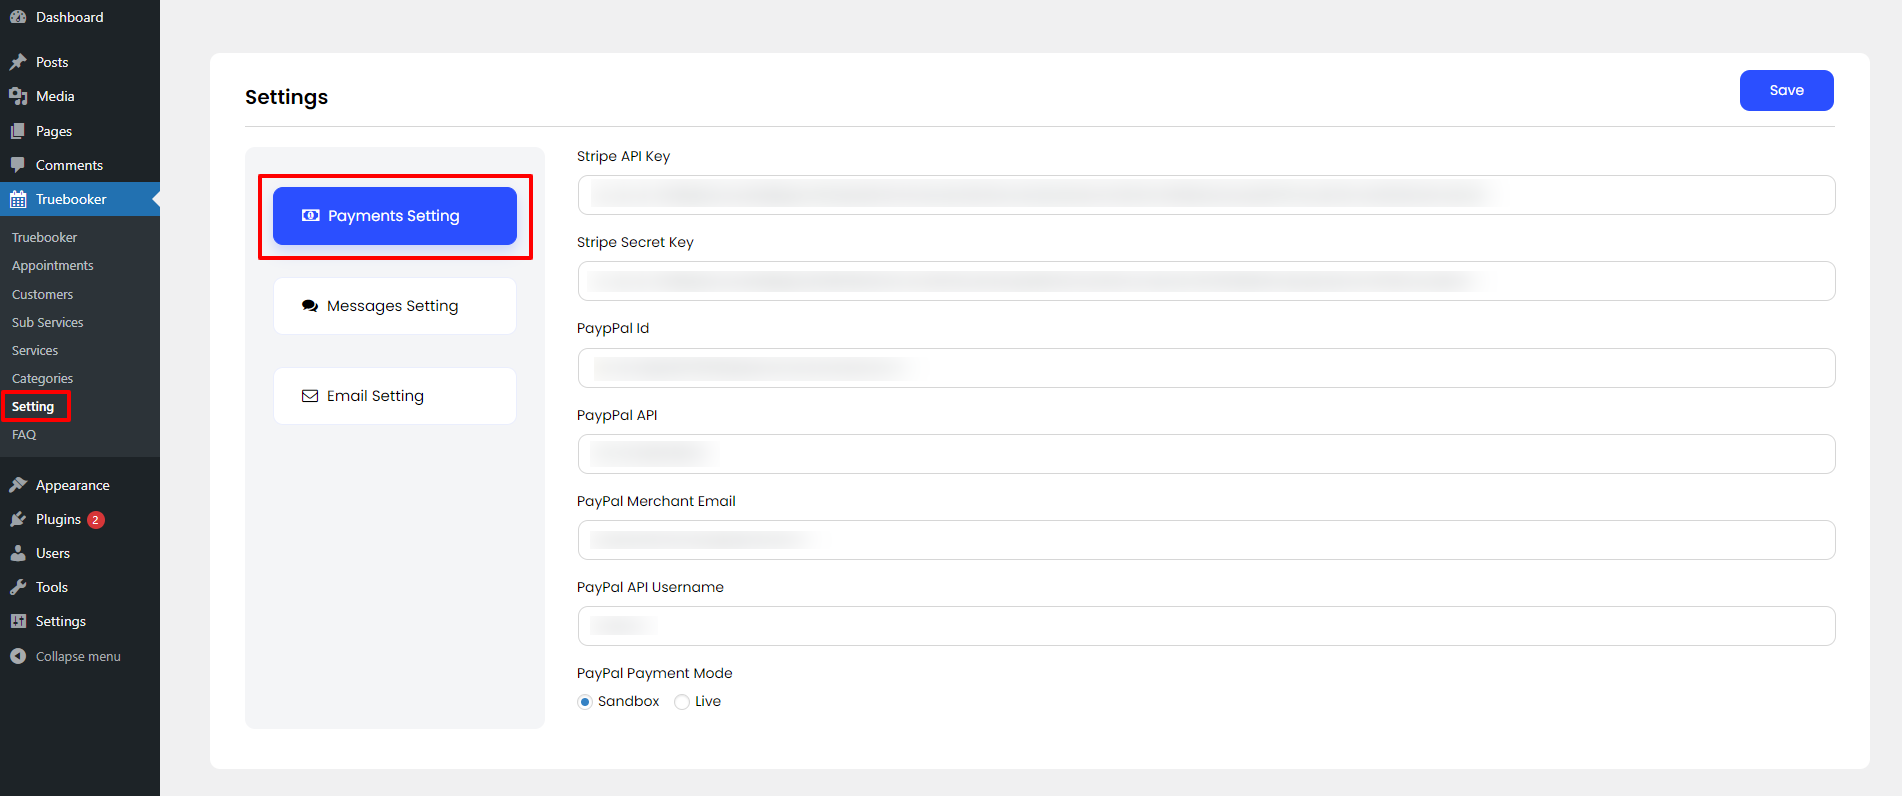
Here you can add payment options include Stripe, PayPal details. Add details like Stripe API Key, Stripe Secret Key for Stripe payment method. PaypPal Id, PaypPal API, PayPal Merchant Email, PayPal API Username and PayPal Payment Mode (You can select Sandbox or Live) in PayPal payment method and save your data. You can also update from here.
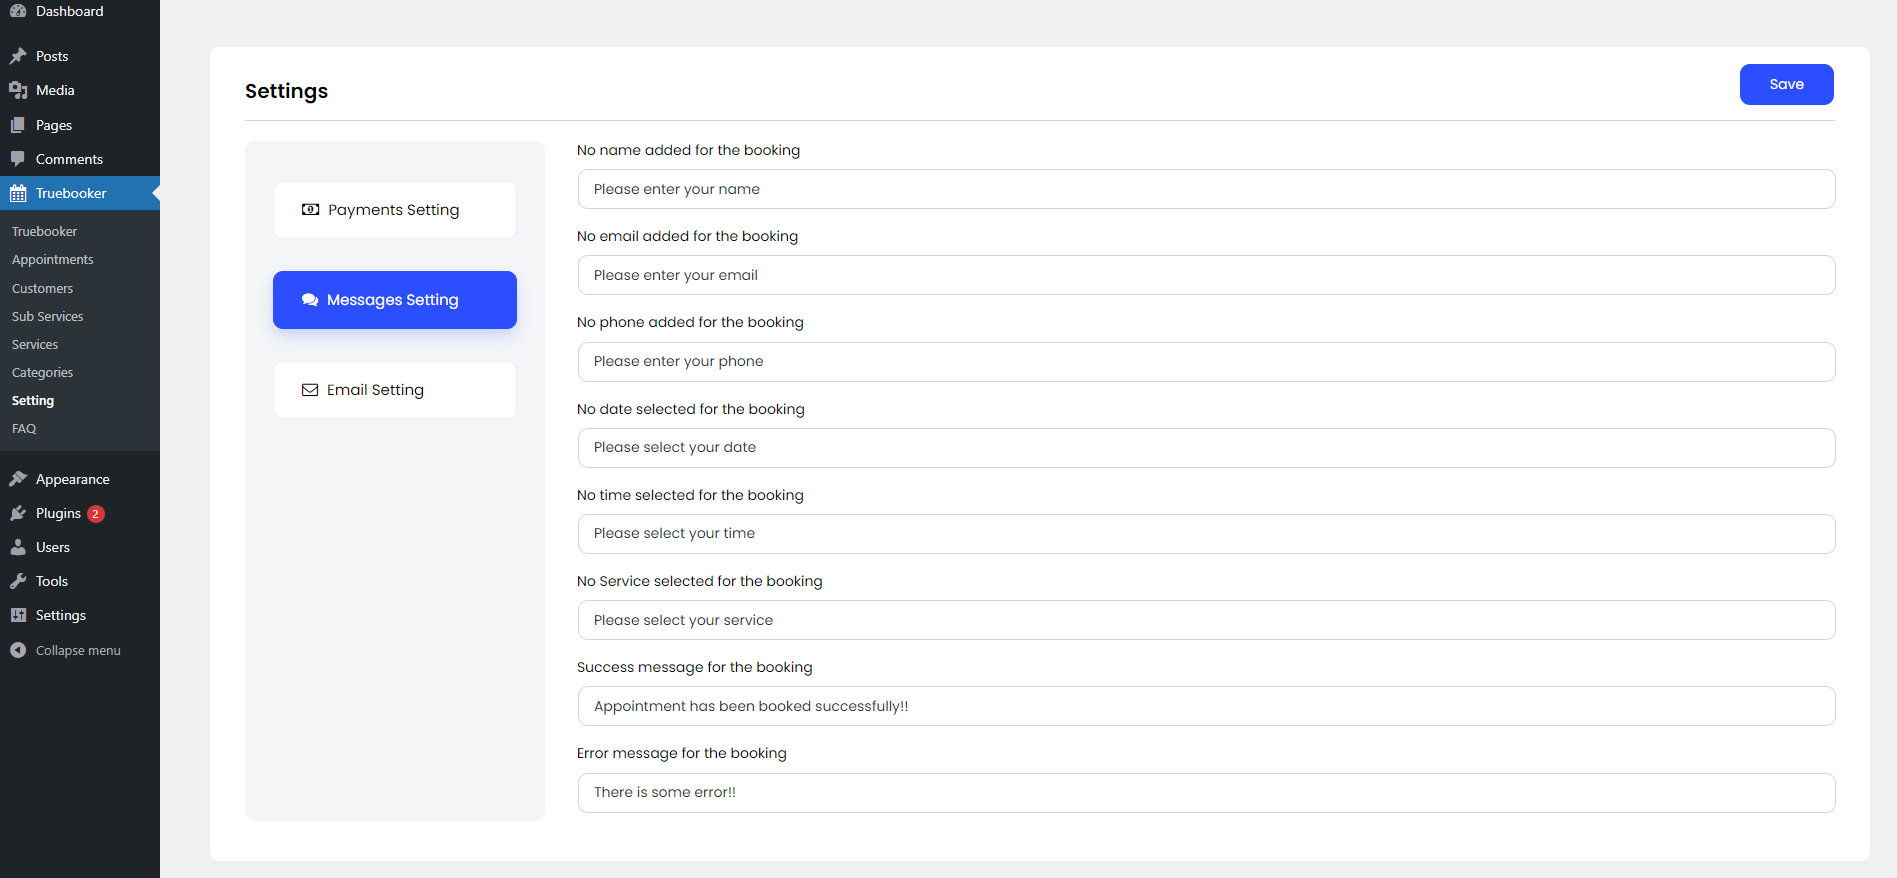
Message Settings
You can adjust/edit the messages or notifications from here.
Email Settings
You can change email settings from here.
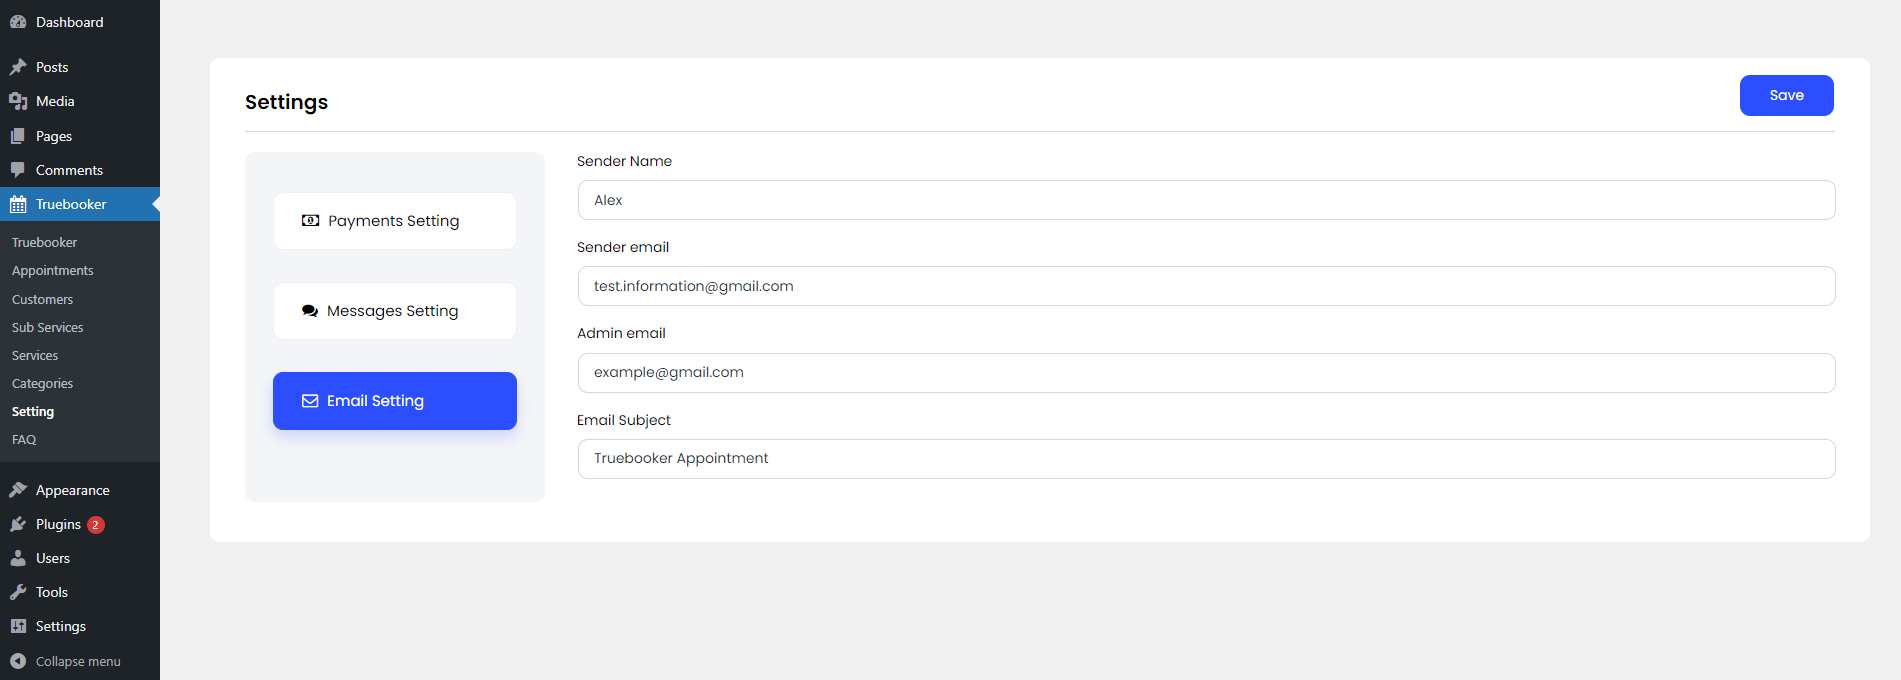
- Sender name – option to add sender name only just for information.
- Sender email – option to add email address for appointment email sent from this email to customers.
- Admin email – option to add email address to show admin email.
- Email Subject – option to add email subject for the single line of text people see when they receive your email.
Notification Settings
You can change email settings from here.
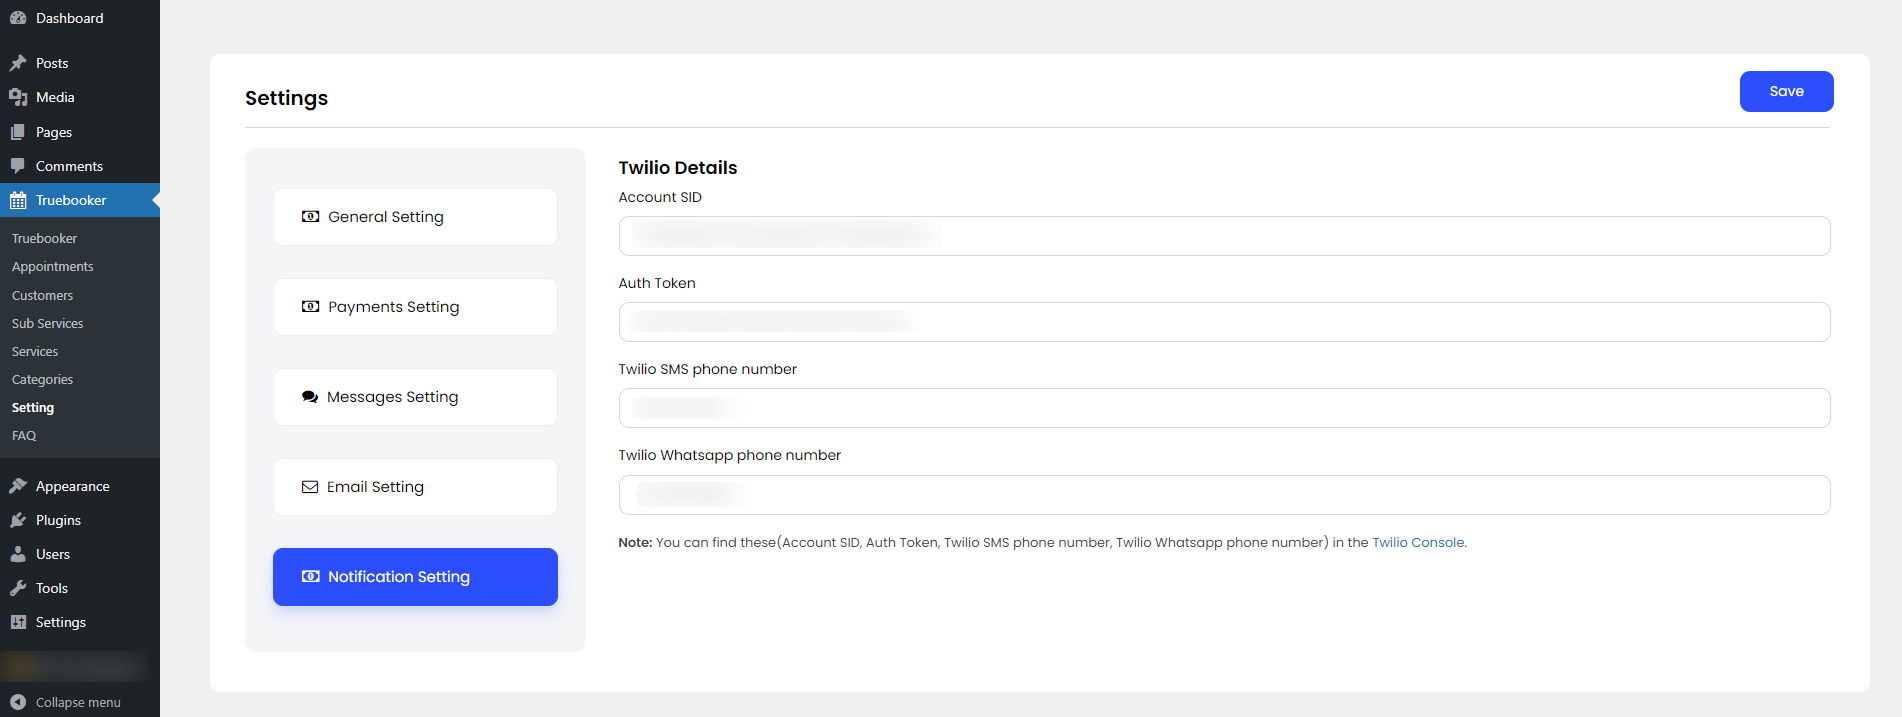
- Account SID – option to add Account SID for get messages.
- Auth Token – option to add Token for get messages.
- Twilio SMS phone number – option to add phone number that provide from Twilio
- Twilio WhatsApp phone number – option to add WhatsApp number that provide from Twilio
Note: You can find these(Account SID, Auth Token, Twilio SMS phone number, Twilio Whatsapp phone number) in the Twilio Console.
Appointments
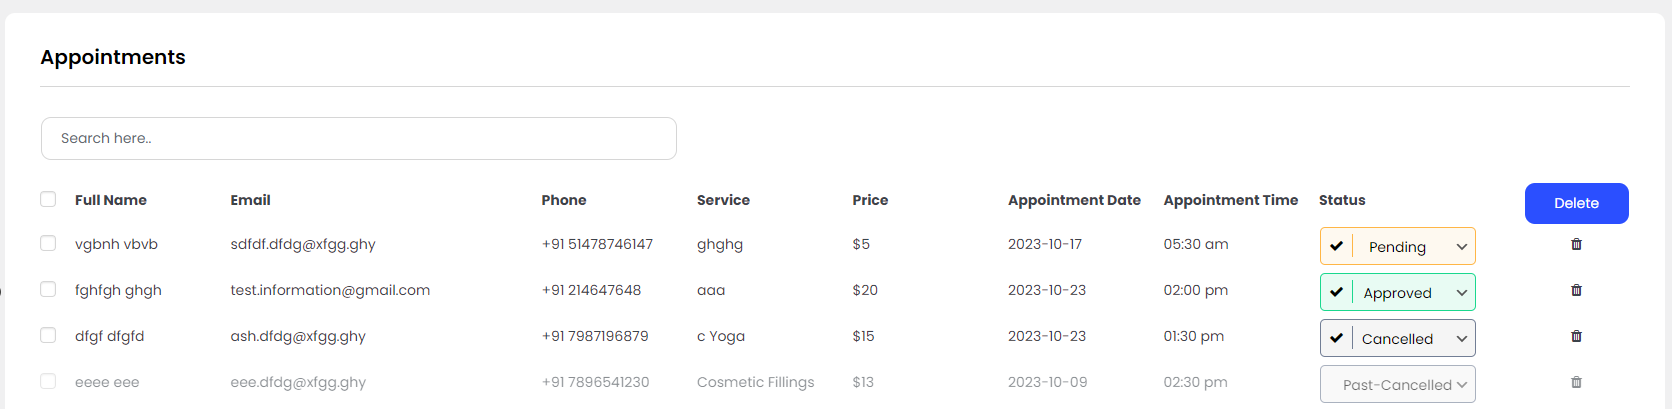
All appointments submitted by customers can be easily managed by the website admin.
Open Truebooker > Appointments. On this page are listed all the appointments.
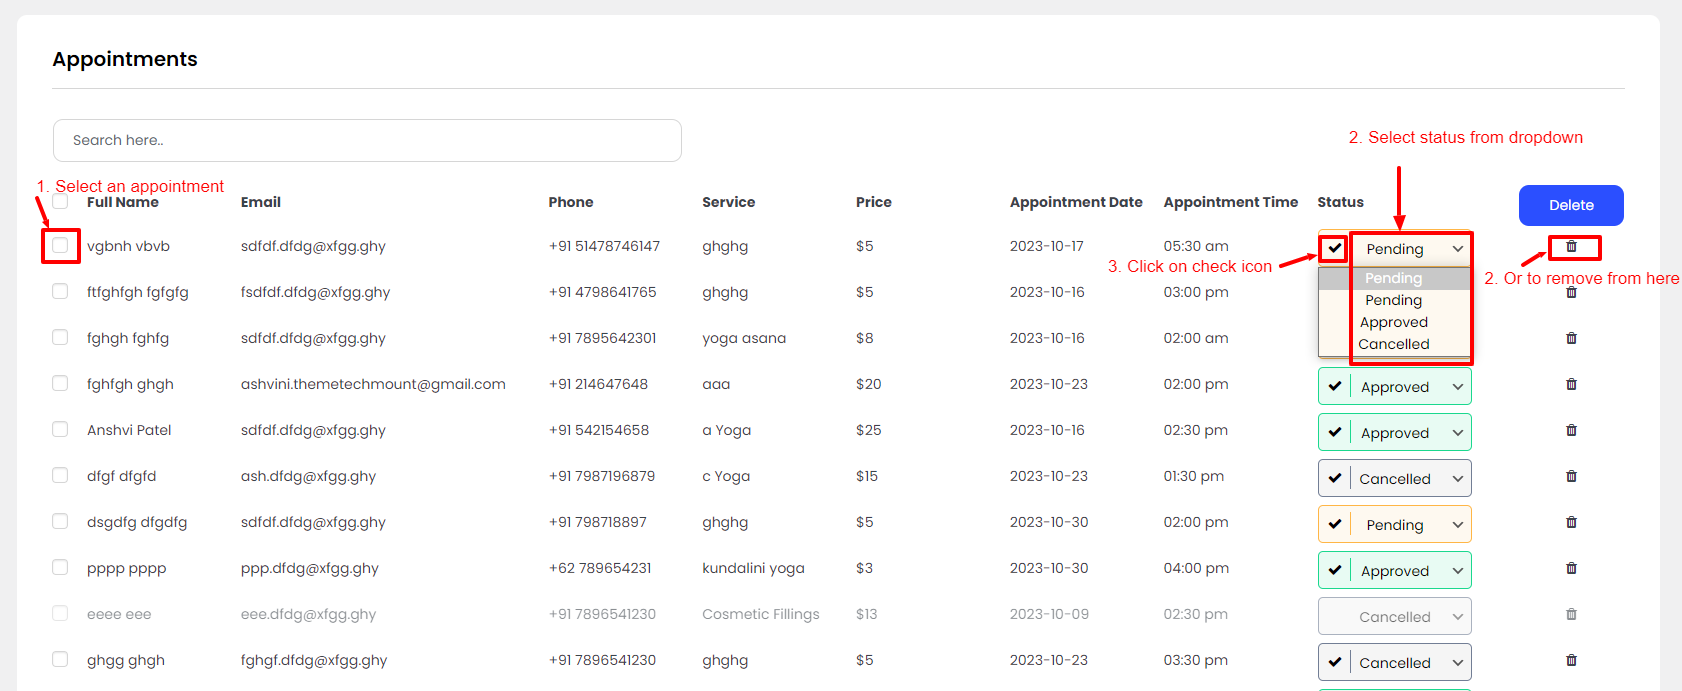
There is a very convenient filtering system so you can set up the display of the appointments depending on the status: Pending, Approved, Cancelled or you can select to display All appointments.
The list includes all the relevant information such as the customer’s name, email and phone number, services, date and time of an appointment, price, status, and action for delete appointment.
Approve, Reject, and Delete appointments
In the Status column, you can find three options you can use: Approved, Cancelled, Pending and in the last column you can find Delete.
Approved confirms the appointment, Cancelled cancels the appointment, and Delete allows you to delete appointment(s).
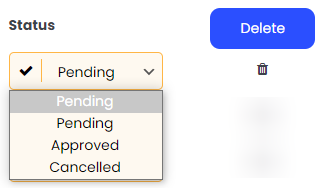
Depending on the action taken — Approved , Cancelled and Pending — the appointment status will be changed automatically to Approved , Pending or Cancelled.
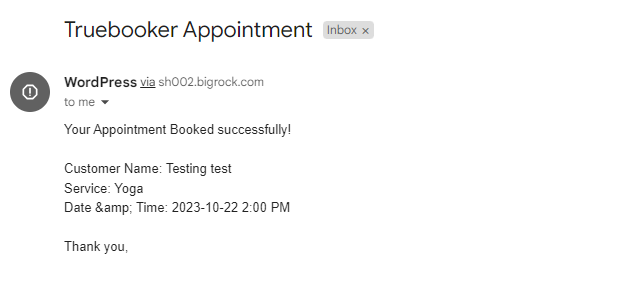
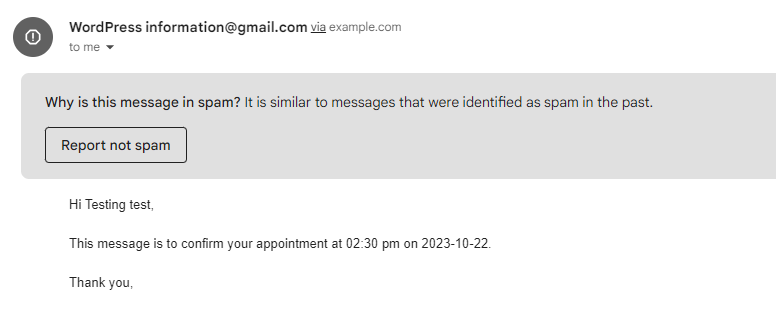
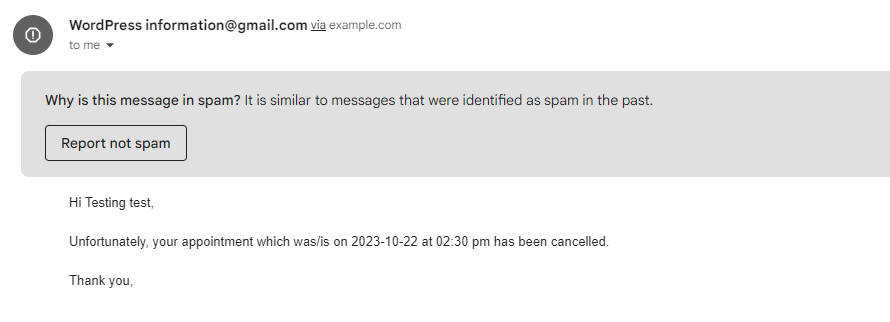
The reason for cancellation and approval will be sent to the user you set up while appointment Cancelled and Approved.
For example, You can see appointment book successfully mail.
You can see appointment book Approved mail.
You can see appointment book Cancelled mail.
Deleting Appointment
You need to click the bin icon to delete an appointment. The pop-up module will appear to confirmation.

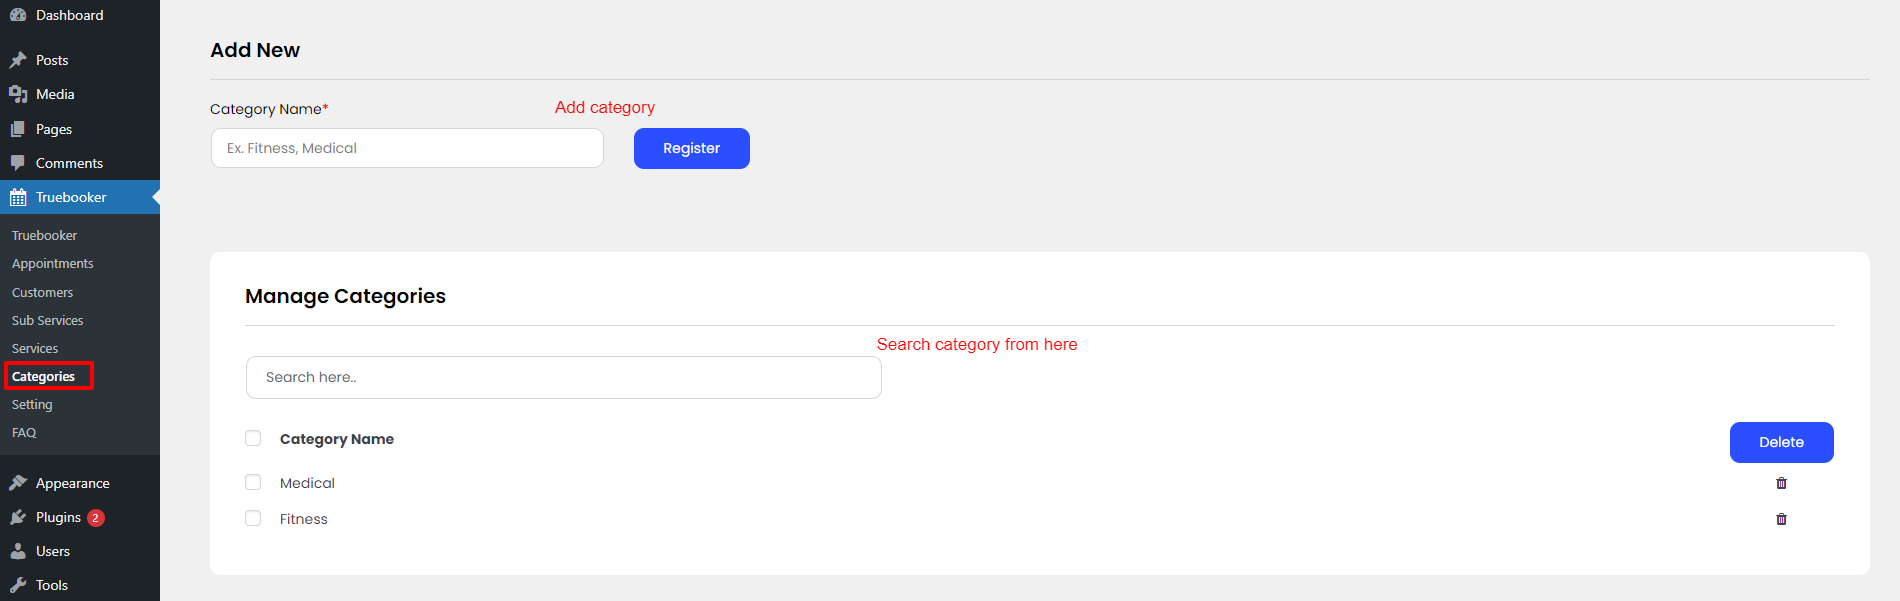
Categories
Truebooker makes it easy for customers to book different categories presented on your website.
Go to Truebooker > Categories.
You can add different categories on your website in order to attach related services/subservices to them.
In the space provided under the Add New Category enter the name of the category and click Register.
Besides this, you can also Search and Delete any of the category you added.
On this page, you can find all the categories, create a new one, and add/delete categories.
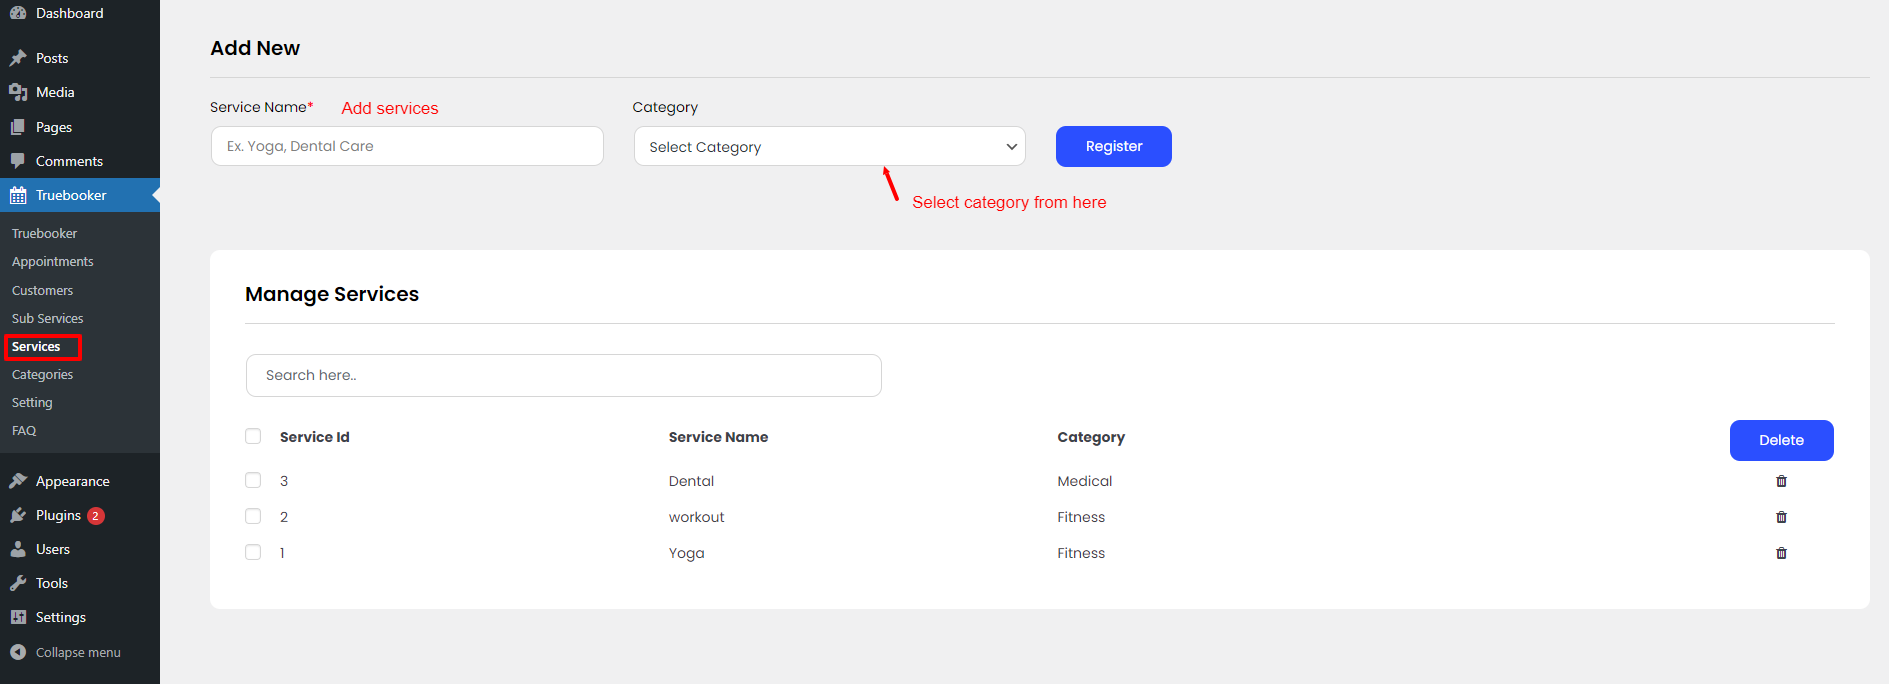
Services
Truebooker makes it easy for customers to book different services presented on your website.
Go to Truebooker > Services.
You can add different services on your website in order to attach related services to them.
In the space provided under the Add New Service enter the name of the service and select category fro dropdown and click Register.
Besides this, you can also Search and Delete any of the category you added.
On this page, you can find all the services, create a new one, and add/delete services.
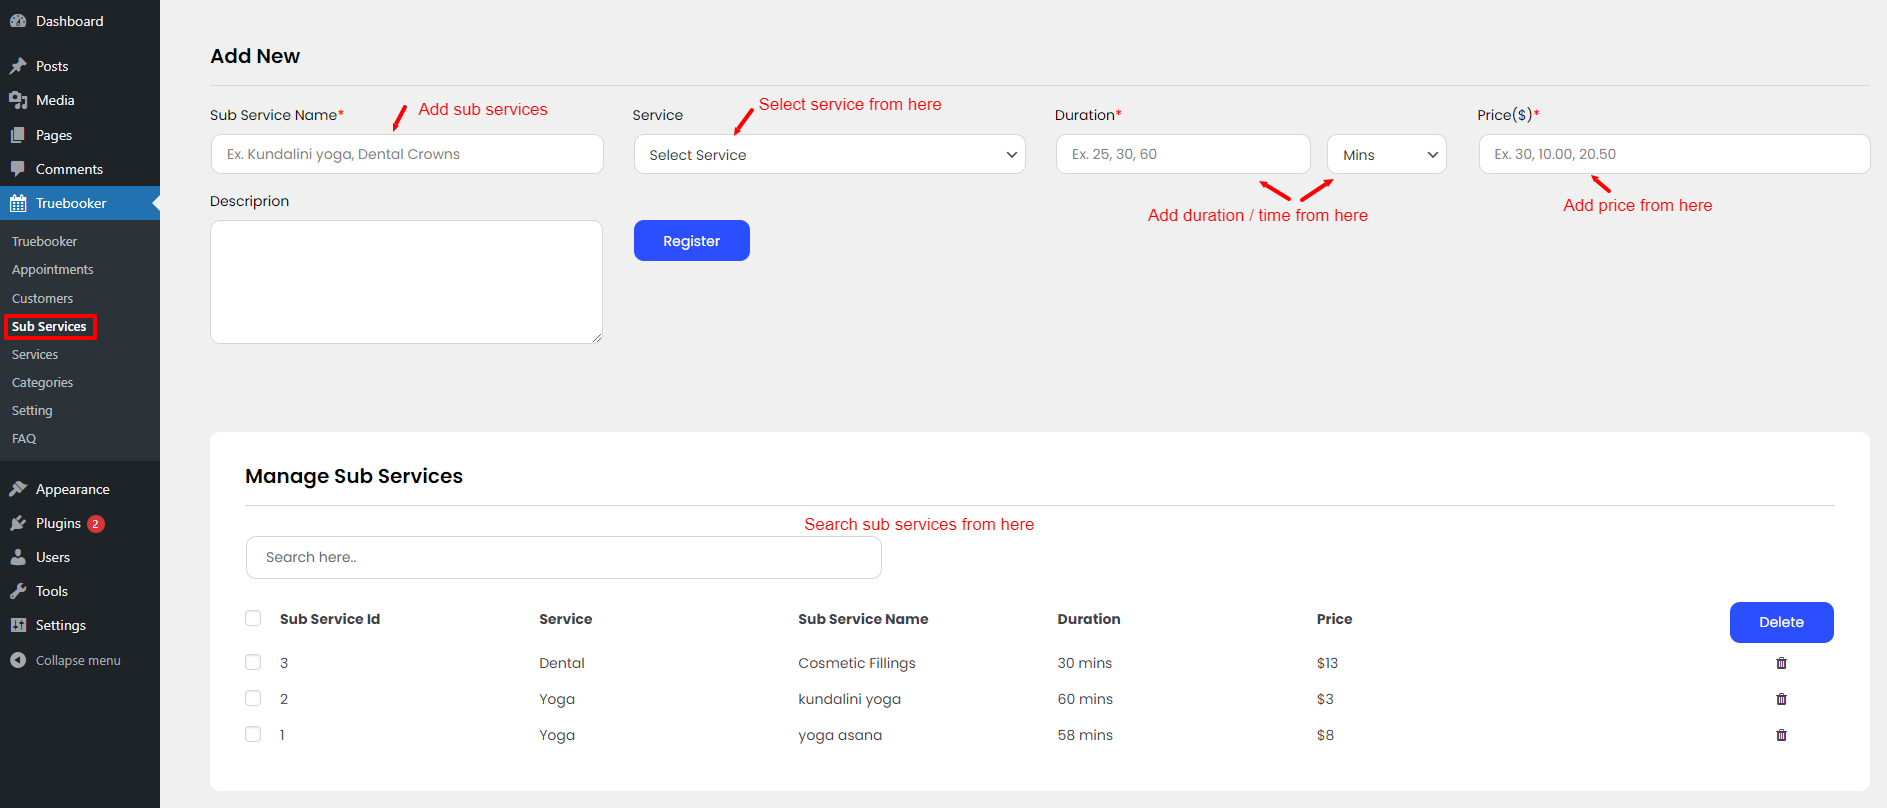
Sub Services
Truebooker makes it easy for customers to book different subservices presented on your website.
Go to Truebooker > Subservices.
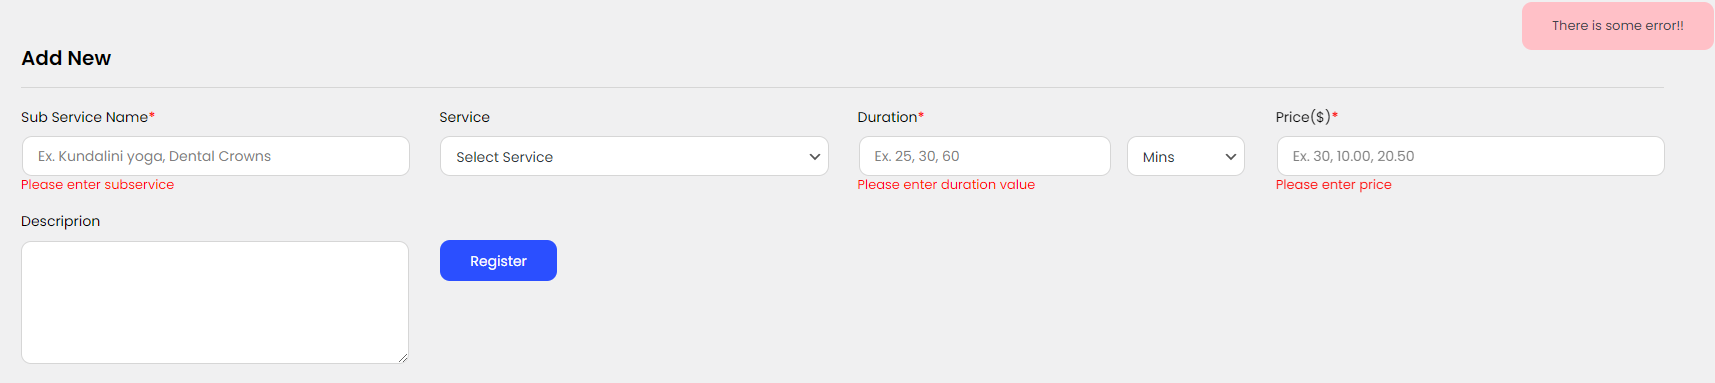
To add a new service click on Add new. In the form enter the required information: add Sub service name, select the service, set the duration for one appointment, and a price for it and add some discription. After that click Add to register for a new service.
Besides this, you can also Search and Delete any of the sub services you added.
On this page, you can find all the sub services, create a new one, and add/delete su bservices.
Customers / Appointment
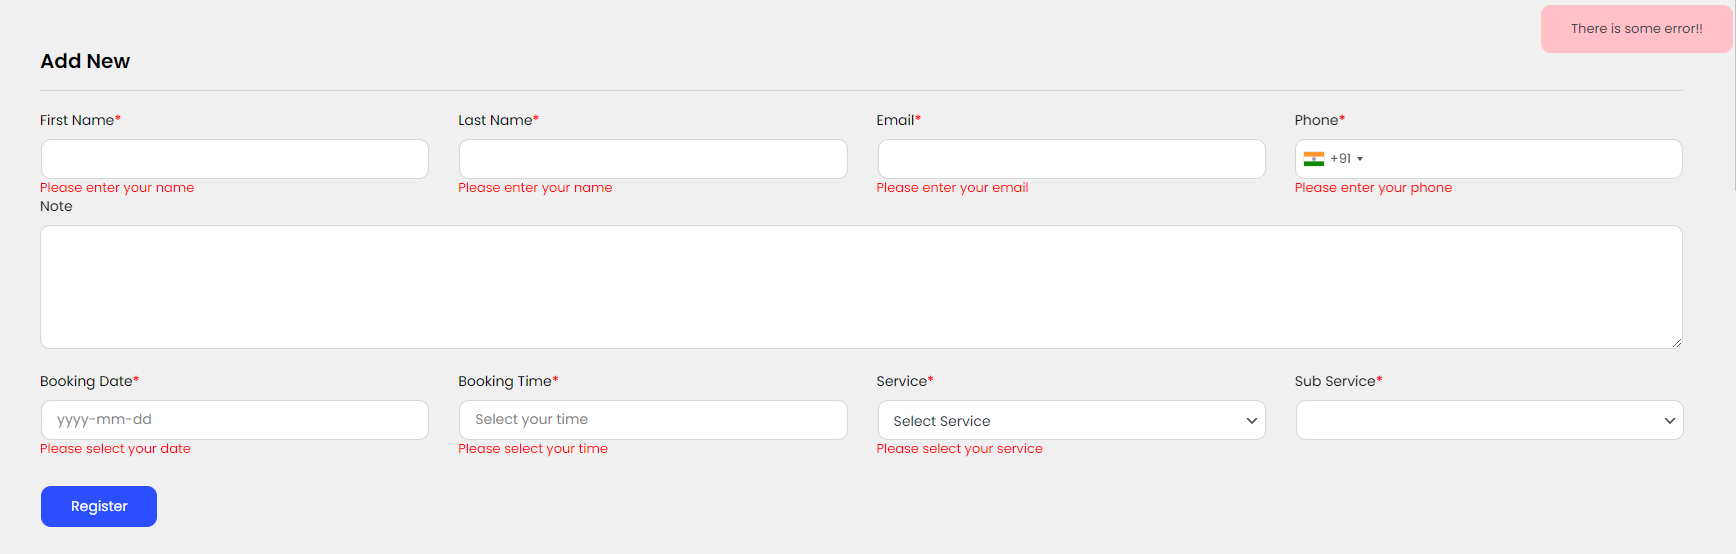
On the Truebooker > Customers page you can find all the customers registered on your website, who booked an appointment.
Enter the information about the customer which includes full name, email address, and phone number. And select the option for an appointment like booking date, booking time, select service and sub service.
Click Add to register changes and add a new customer/appointment.
You can delete the customers' info by clicking on the Delete icon.
When customers click on Register they will get a notification with confirmation/ The booking information will be sent to the customer's email. Also, they can print out the confirmation by clicking on the Print Confirmation option.
The appointment request will be updated after approvement or rejection, any updates will be specified via email.
Data Validation
While booking an appointment, users must fill the required fields correctly due to the data validation rules. Admin of website should also the data validation rules while creating a new service, a new category, a new customer, a new staff. Now, we will show examples for each data one by one and it will help to fill the booking forms correctly with valid data.
Full Name Validation
First Name and Last Name of Customer should be not empty when you want to create a new user or register a new customer:

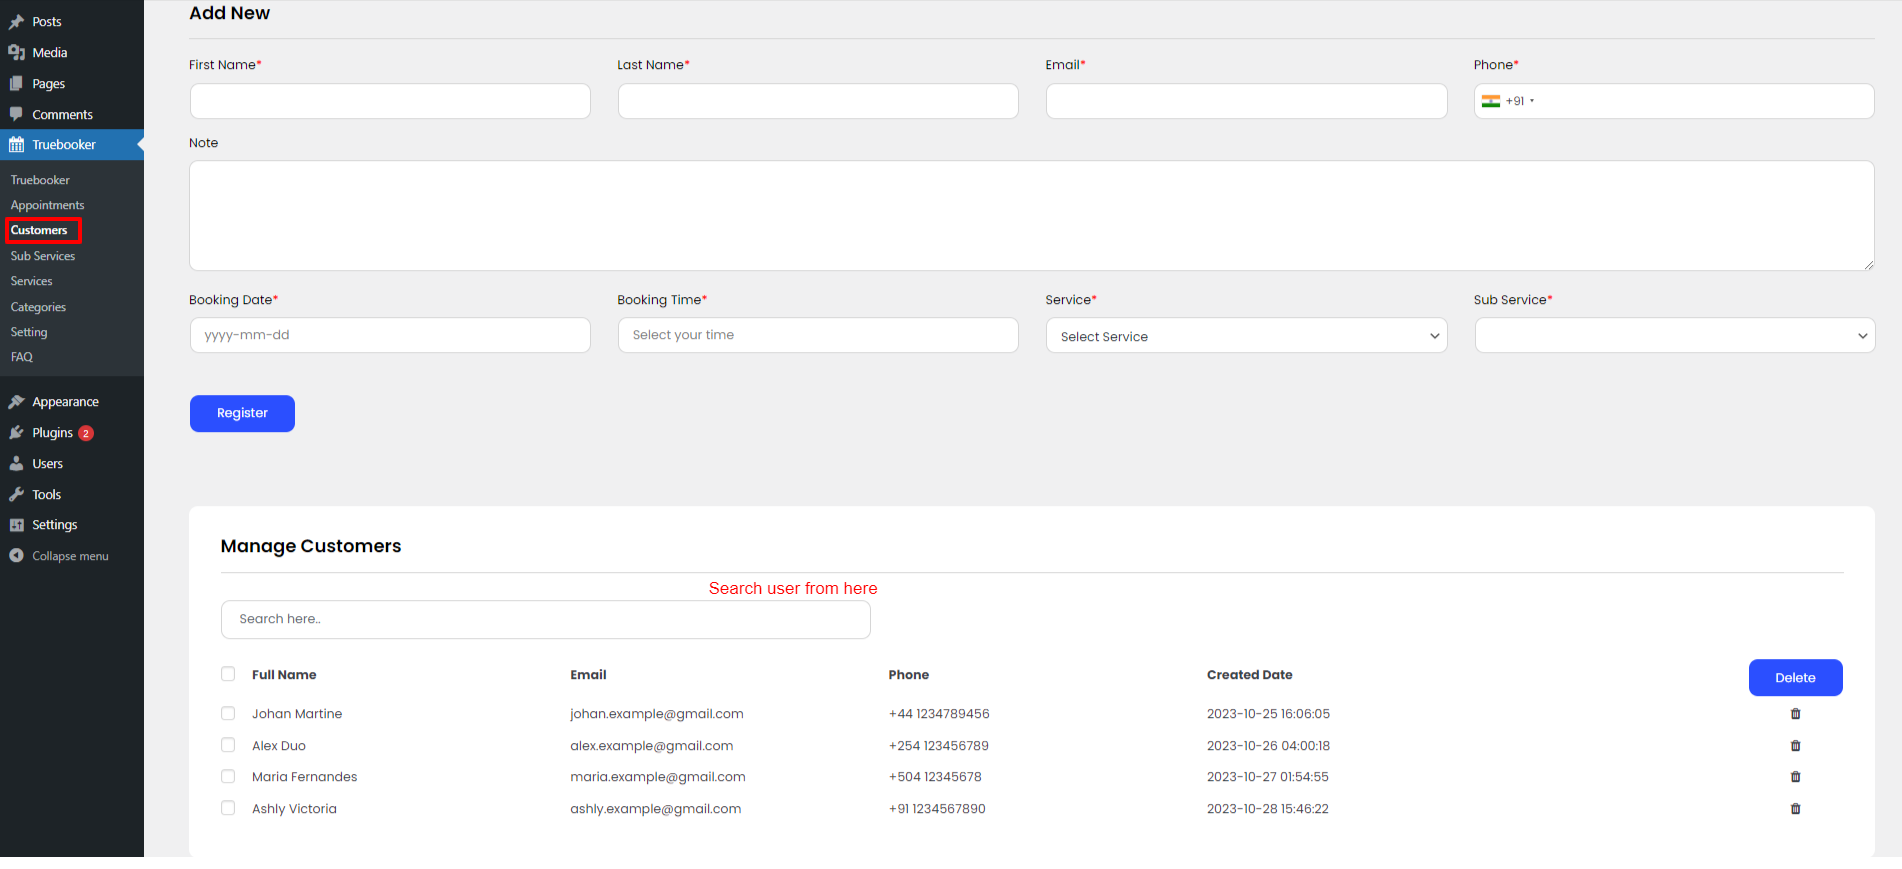
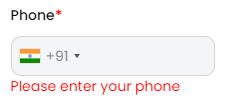
Phone Number Validation
Phone number of Customer should be not empty and the rejected symbols for the phone numbers are not considered a valid phone number:
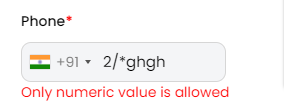
Email Validation
Email must contain "@" with a domain name. Any rejected symbols will throw invalid data message:
Sub Service Validation
When a new service is added, all required data should be filled with the proper information. Adding service requires the service price, category, correct title. Without a price, category, or valid service title, a new service will not be created:
Category / Service Validation
A new category and new service should not be empty:


Customer / Appointment Validation:
A new customer or appointment should follow the above validation rules for full name, email, phone number, booking date, booking time, and services.
Booking Form Templates
Two Booking Form templates are available in the Truebooker.
Default template
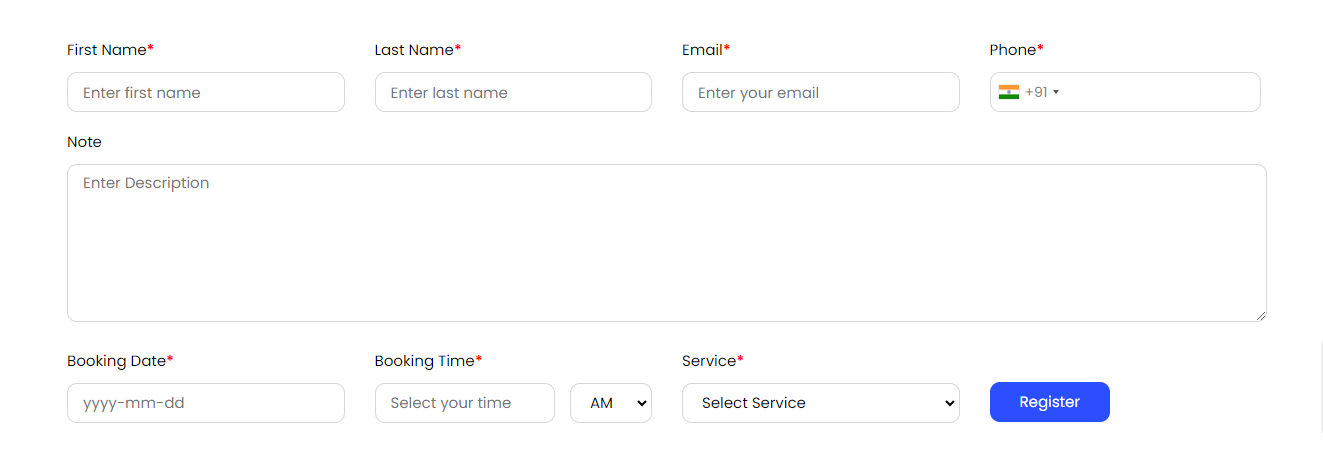
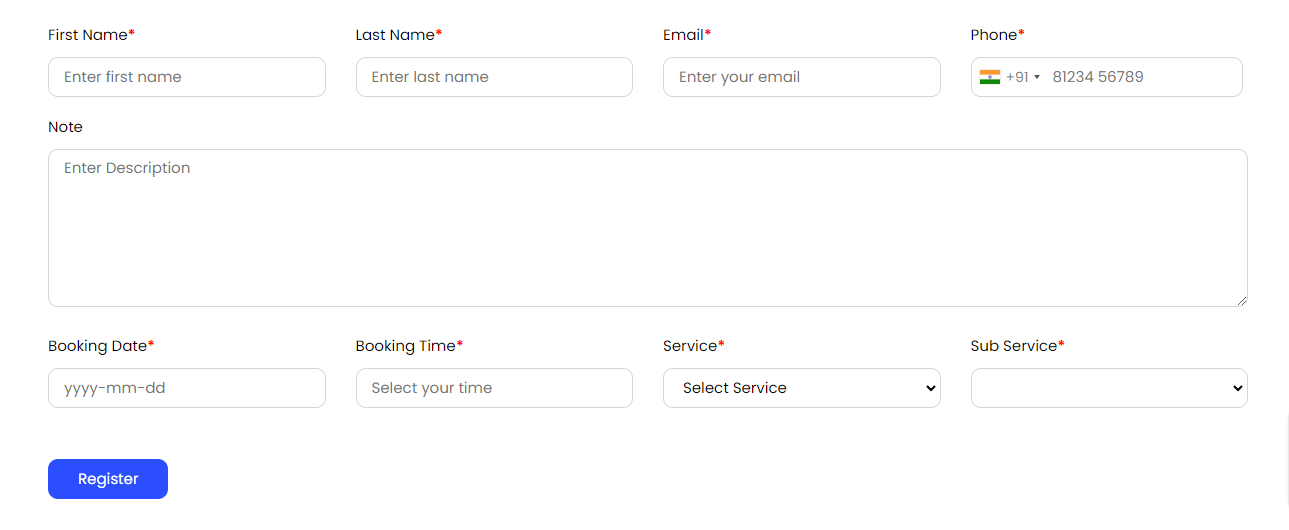
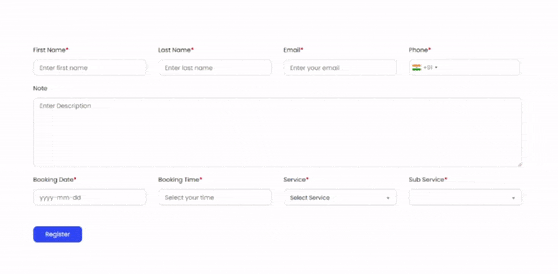
The Default form template is a simple way of making appointments by selecting available service, subservice and choosing available booking date and time from the form and add some details.
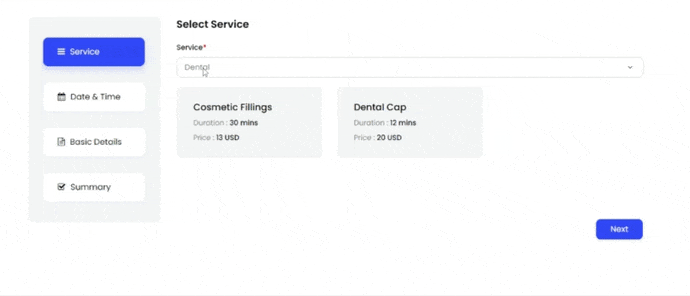
Tab style template
Tab style template is a consistent method of booking services including five stages of making appointments: Service step; Date & Time step; Details step; Confirmation step; Payment step.
Tab style have print option for your appointment summary print.
RTL Support
The Truebooker WordPress scheduling plugin is not just limited to and aimed at English websites. The built-in support for the RTL writing system is also included.
Google Calendar Sync
Customers/clients can add The truebooker appointments directly to their Google Calendar, as can the site admin and staff members.
Truebooker Payment
Stripe
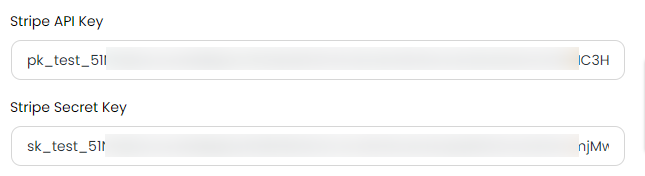
To use Stripe as a payment method for appointments, go to Truebooker > Setting > Payment Setting. Enter Publish / API Key and Stripe Secret key.
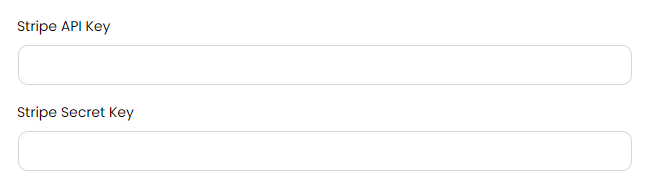
Note : You can create a Stripe account on the official website of Stripe
To collect the keys you need to log in to the Stripe site. All the keys are available on the Home page of your Dashboard.
In order to get the test key, follow Dashboard > Get your test API keys, and to get the live keys, go to Dashboard > Get your live API keys.
Copy your Keys and paste them to the required fields under the Payment Setting tab.
When customers are booking the appointment they need to select Stripe Payment option and click on it.
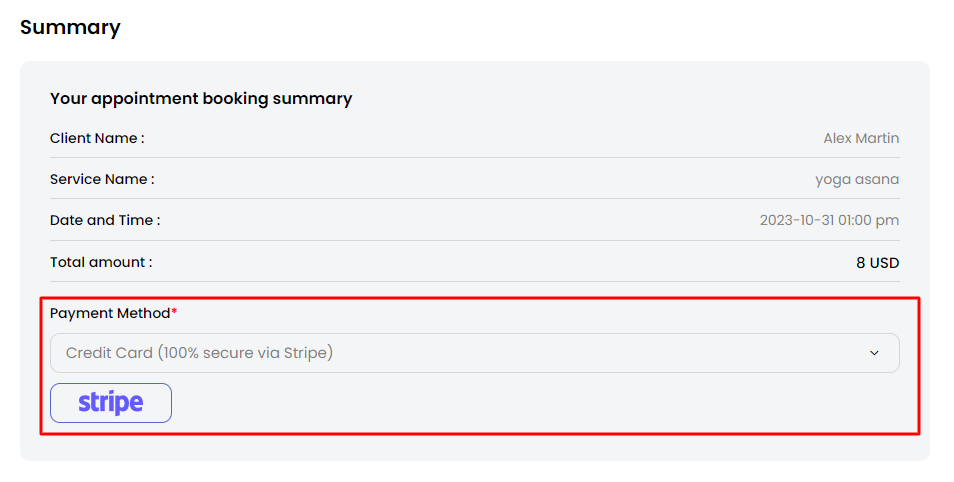
Note : Please note that all transactions are managed by Stripe.
PayPal
To use PayPal as a payment method for appointments, go to Truebooker > Setting > Payment Setting. Enter PaypPal Id, PaypPal API, PayPal Merchant Email, PayPal API Username, and PayPal Payment Mode.
Just install the plugin and create slider in it. Then copy it's shortcode and paste it in the custom slider box shown in below image:
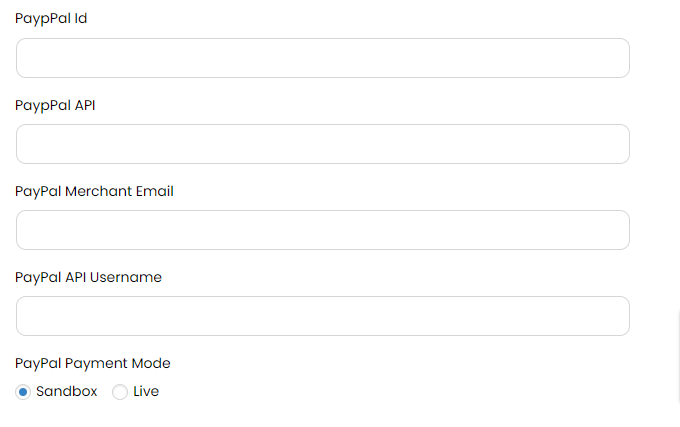
Note : For the correct PayPal performance, you need to set up IPN Listener Settings.
When submitting the booking, select Pay with PayPal as a payment method.
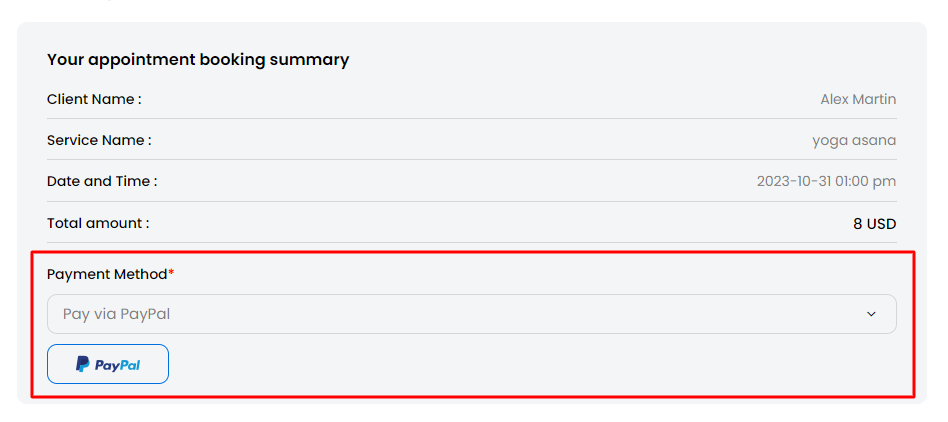
After clicking on it customers will get a request confirmation and will be redirected to PayPal.
The customer will need to log in to PayPal and proceed to checkout.
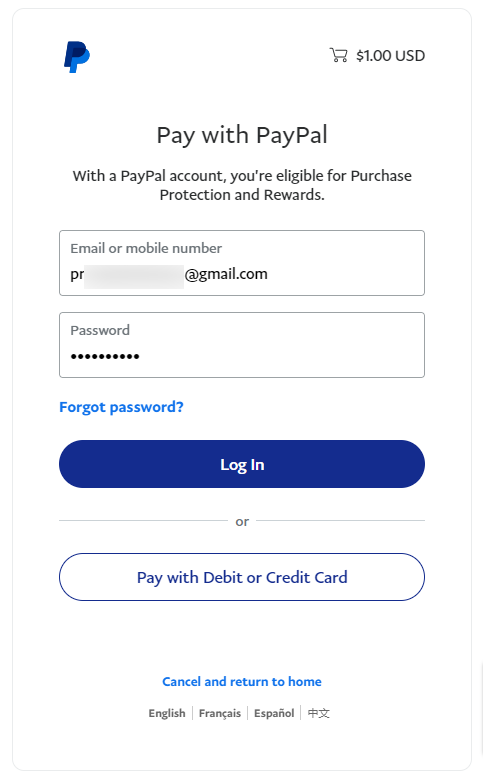
If the payment completed successfully there will be a popup notification with the purchase details.
Freqently Asked Questions
This page contains solutions for general questions
Q1: How to use this plugin, can you describe its steps?
A1:Step 1 : Download the plugin archive file and follow to Plugins > Add New from your dashboard. Click on the Upload Plugin button and select the Truebooker file. Click Install Now and wait for the installation to finish. After the installation, you need to activate the plugin and you can start working.
Now first you need to set details so go to Truebooker > Setting. On the settings screen, you can find different tabs for different options. Add payment details in Payment Setting and add email details in Email Settings (Sender Email is for appointment email send from this email to customers.) and also you can change inbuilt messages in Messages setting and then click on save button at top right of form.
Step 2 : Go to Truebooker > Categories and add new categories like Fitness, Medical, Spa etc.
Step 3 : Go to Truebooker > Services and add new service like Workout, Yoga, Zumba etc for Fitness. Surgery, Dental Care, Orthopedic etc for Medical and body treatments, Aromatherapy Massage, Facial Spa etc for Spa.
Step 4 : Go to Truebooker > SubServices and add new sub services like Push-up, Running, Strength training for Workout (Hatha yoga, Kundalini yoga etc for Yoga and Fitness Zumba, Zumba Gold etc for Zumba). Laparoscopy, Endoscopy, Cataract surgery etc for surgery (Dental Crowns, Cosmetic Fillings etc for Dental Care and Bone deformities, Fractures etc for Orthopedic) and Body Scrubs, Dry brushing, Moisturizing body treatments etc for body treatments (Swedish Massage, Aromatherapy Massage etc for Massage and LED Facial, Anti-Aging Facial etc for Facial Spa.)
Step 5 : Now you can add appointment go to Truebooker > Customers Fill the form and add appointment.
On the dashboard you can see Total appointments, Pending appointments, Approved appointments, Total customers and Total revenue. You can easily change appointment status from the dashboard and Truebooker > Appointments page just select appointment and click on select box and then click on check icon and it will be done.
For frontend you can easily add shortcode for form in Classic Editor of WordPress, Elementor Website Builder, WPBakery Page Builder and Gutenberg page builder of WordPress.Shortcode for free plugin : [booking_form]
Shortcode for premium plugin : [booking_form style="default"], [booking_form style="style1"] and [booking_form style="style2"]
Q2: How easy is it to set up?
A2:It is ridiculously easy to set up the Truebooker plugin.
- Go to your WordPress’ admin page, open Truebooker -> Categories , Truebooker -> Services, and add categories and services.
- Add [booking_form] shortcode to one of your posts or pages for free plugin.
- Add [booking_form style="default"] shortcode to one of your posts or pages for default style of premium plugin.
- Add [booking_form style="style1"] [booking_form style="style2"]shortcode to one of your posts or pages for style1 and atyle2 of premium plugin.
- Save it and Now customers can book appointments from your site’s front-end using Truebooker!
Q3: Where can I publish a appointment booking form?
A3:Here are the ways to add a shortcode [booking_form] for booking form.
- In the WordPress page
- In the WordPress post
- In the WordPress custom post
- In the WordPress custom post
Q4: Is it possible to pay online?
A4:Absolutely! Payment with PayPal and Stripe is available along with On-site payment.(Pro Version Only)
Q5: Which page builders are supported?
A5:truebooker has dedicated blocks for following Page Builders
- Classic Editor of WordPress
- Elementor Website Builder
- WPBakery Page Builder
- Gutenberg page builder of WordPress
Q6: How to upgrade to Truebooker Pro?
A6:You can purchase Premium version of Truebooker via our official website or you can also upgrade to premium from free version.
Q7: Can the notifications be customized?
A7:Yes! you can set the messages you want to show at the frontend booking. You can set error/success and other common messages.
Q8: Do I need to have coding skills to use Truebooker Plugin?
A8:There is no need to learn any coding skills for operating Truebooker Plugin.
Q9: Can we get SMS notification and WhatsApp notification through this plugin?
A9:Yes, You can get SMS notification and WhatsApp notification through Truebooker premium plugin.
Q10: Where do I get notification settings details?
A10:You can find these(Account SID, Auth Token, Twilio SMS phone number, Twilio Whatsapp phone number) in the Twilio Console.
Thank you for use this plugin.
Once again, thank you so much for purchasing this plugin. As I said at the beginning, I'd be glad to help you if you have any questions relating to this plugin. No guarantees, but I'll do my best to assist. If you have a more general question relating to the plugin on Themetechmount, you might consider visiting the forums and asking your question in the "Support" section.